Android-x86 virtual machine configuration tips
Android-x86 virtual machine configuration tips
There are already several guides to install android x86 on virtual machines, but never about configuring them. This guide will show the most useful tips and tricks. If you read this without an Android x86 virtual machine follow below guides to install android x86 on a virtual machine:
This guide is writing with Androidx86 7.1-r2 as android version.
Configure Android x86 to run with a GUI
Android is based on Linux, which result that a default installation results in only terminal access. If you want a graphical user interface, and Yea we all want to use Android the same as a phone, we need to configure it to boot with a GUI.
During installation GRUB is installed. Every time the Android x86 device boots, first GRUB is visible.

In the GRUB menu select the Android-x86 7.1-r2 (Debug mode) menu item and press enter. Within a few seconds Android is booted in debug mode. Within this debug mode GRUB can be configured to boot with a GUI.
Execute the following steps:
- Execute the command mount -o remount,rw /mnt to remount the GRUB share
- Execute the command cd /mnt/grub to navigate to the GRUB share
- Execute the command vi menu.lst to open menu.lst inside vi (command line editor)
- Inside vi: 4 Android boot configuration are visible
- Inside vi: Navigate to the first Android boot configuration
- Inside vi: Add to the line which starts with kernal /android.. on the end nomodeset UVESA_MODE=1024x728
- Inside vi: Save the changes
- Execute the command reboot -f to reboot the device

Upon booting the GRUB menu select the first option and Android with a GUI will boot. When booting for the first time it can take several minutes.

Configure Android x86 with a static IP address
Often Android x86 is used to act as Android device within a Continuous Integration (CI) environment like Jenkins. With the available network interface an adb connecting can be created.

For these usage is not recommended to configure Android network interface with DHCP, every day the Android device can get a different IP address. The easiest way to configure a static IP address is again in debug mode.
Reboot the Android device and in the GRUB menu select the Android-x86 7.1-r2 (Debug mode) menu item and press enter. Within a few seconds Android is booted in debug mode.
- Execute the command cd /android/etc to navigate to the etc folder
- Execute the command vi init.sh to open init.sh inside vi (command line editor)
- Inside vi: Navigate to the end of the file
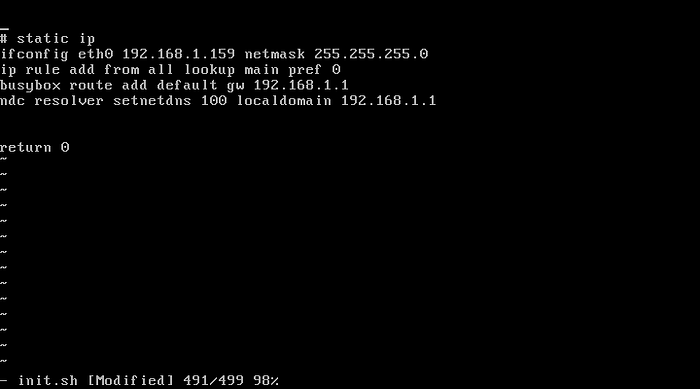
- Inside vi: Add the following lines, just before return 0
ifconfig eth0 192.168.1.159 netmask 255.255.255.0
ip rule add from all lookup main pref 0
busybox route add default gw 192.168.1.1
ndc resolver setnetdns 100 localdomain 192.168.1.1
- Inside vi: Save the changes
- Execute the command reboot -f to reboot the device
The next this Android x86 is booted above configuration is loaded and the device has a fixed IP address.
Thank you for reading this article, If you liked the article, help others find this article by sharing it.
Originally published at https://androidadepth.blogspot.com on April 19, 2019.